Quantcast
Growing Hops: How to Plant, Grow, and Harvest Hops at Home | The Old Farmer's Almanac

Hops

Photo Credit
Pixabay
Botanical Name
Humulus lupulus
Sun Exposure
Soil pH
Bloom Time
Flower Color
Hardiness Zone
No content available.
Subhead

Planting, Growing, and Harvesting Hops

Print Friendly and PDF

Looking to brew your own beer? One key flavoring ingredient is hops, which you can grow in your backyard! Here’s how to plant, grow, and harvest hops at home.

Home brewing has a long history; some anthropologists believe that beer is as old as civilization itself. Brewing was often a sacred ceremony and every culture has stories concerning fermentation and its ability to heal and nourish as well as to inebriate. In Elizabethan times, water was not fit to drink, so beer was the drink of the day.

While hops is the most popular ingredient for the home-brewer, many other brewing crops can be grown at home, including grains, fruit, and flavorful herbs.

Planting

When to Plant Hops

  • Plant in spring after the last frost
  • Hops need a minimum of 120 frost-free days to flower and produce a good crop.
  • During the first year, the plant is establishing its root system and only a few flowers are produced. In the second year, the plant will produce a normal crop of hops.

Choosing and Preparing a Planting Site

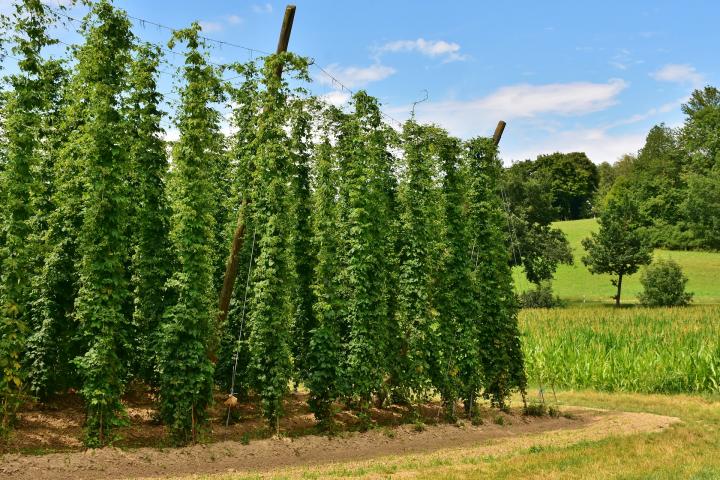
  • Hops need a strong trellis system for the bines (the technical term for hopsā€™ ā€œvinesā€) to climb on. Bines can grow to over 25 feet and weigh over 20 pounds.
  • Soil needs to be loose (well-aerated by turning over several times). It should also be well-draining; hops don’t like to have consistently wet roots. 
  • Add aged manure or compost to the soil before planting. 

How to Plant Hops

  • Commercial hops are propagated via root cuttings or rhizomes, not from seeds. This ensures that desired chracteristics are carried forward. Nurseries may carry hops, or they can be ordered online.
  • In the home garden, hops are best planted in hills. Space the hills at least 3 feet apart. In large-scale operations, they are often grown in rows and allowed to twine up wires (see picture below).
  • Plant two rhizomes per hill with the buds pointing up and the roots of the rhizome down. 
  • Dig a hole that’s about twice as wide as the pot and as deep.
  • Place the plant in the hole and backfill. Be sure to plant the hops plant no deeper than it was in its pot. 
  • Water deeply at the time of planting.
  • Cover the hills with some straw or light mulch to control weeds.

Hops plants trained up wires

Growing

How to Grow Hops

  • In the first year, hops plants may require frequent light watering to help them get established. 
  • Mature plants will benefit from regular watering if rainfall is sparse. 
  • Hops need plenty of water, but should not be water logged. This is why well-draining soil is important.
  • In the first year, the focus should be on allowing the plants to develop their root system, so refrain from pruning or removing any foliage or bines. After the plant is established, select 2 to 6 bines from each hill and train them up a support. Unused bines can be pruned off or stuck into the soil and allowed to produce rhizomes for new plants.
  • Train the bines to climb on a trellis or other support system. Hops can be grown by wrapping the bines around twine or wire that has been staked in the ground and attached to the side of a building, fence, or other support. Bines naturally twine clockwise, so be sure to wrap them in the right direction!
  • Make sure to support the lateral branches to prevent tangling. 
  • Most flower cones are produced on the upper part of the lateral branches and should be ready for harvesting in late summer.

How to Propagate Hops

  • At the end of the season, bury a few healthy bottom bines in the soil for propagating new plants in the following spring. 
  • Bury the bines in a shallow trench and mark their location.
  • In spring, dig up the bines and cut them into pieces about 4 inches long. Make sure each new cutting has an eye or bud.
  • Plant the cuttings in hills.
Harvesting

When to Harvest Hops

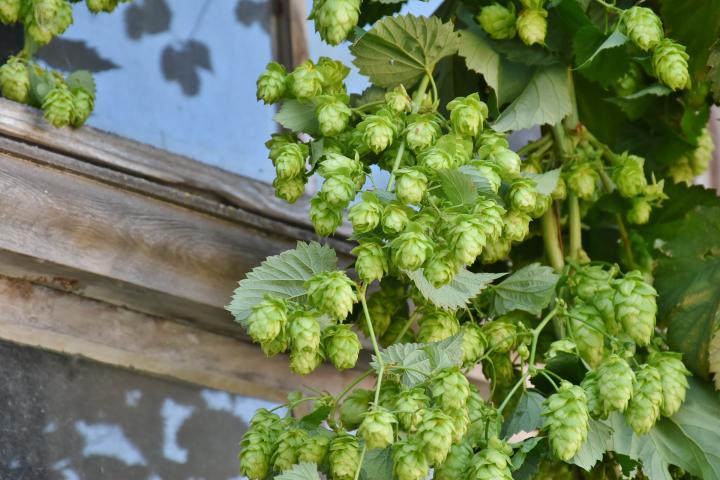
  • Harvest hops at the end of the growing seasonā€”usually late summer. 
  • Squeeze the flower cones to see if they have started to dry out. 
  • Let the bines dry on the support system or cut them down and lay them down on the ground to dry before pulling off the cones. 
  • Finish drying the cones on screens in the sun or in a well ventilated room.

Hops on the bine

How to Store Hops

  • For the freshest flavor, store the dried cones in airtight containers or vacuum-sealed bags in the freezer or refrigerator until ready to use. 
Wit and Wisdom
  • Hops have a soporific effect and the flowers have long been used in dream pillows to induce sleep.
  • Hops can grow up to 12 inches a day.
  • Hop bines always twist in a clockwise direction.
  • Each hop cone consists of 60 individual flowers surrounded by bracts.
  • One hop plant can survive up to 50 years in the wild.
Pests/Diseases
  • Aphids
  • Spider Mites
  • Cutworms
  • Downy Mildew
  • Verticillium Wilt
  • Viruses: Viruses may cause tip dieback, yellow spots on the leaves, stunted growth, and failure to climb on the support. Affected plants should be removed and destroyed. Rootstock purchased from a reliable source is unlikely to have virus problems.
Cooking Notes

Young hops shoots in the spring are delicious sautƩed or pickled. Prepare them the same way you cook asparagus shoots.

Gardening Calendar