
How to make a DIY raised flower bed with wood
While I’ve been growing flowers, herbs, and veggies for decades, building a raised flower bed was a first. What I realized through the process is that it really is so simple and straightforward! Come along to see just how easy it is to add a new raised flower bed, including a short supply list, instructions, and pictures.
This guide to building a flower bed can work for anyone who wants to grow a flower garden for their own joy, hope, healing and beauty! This is my second post in a series, so you may wish to go back to the first steps on getting started with flower gardening before you start building!
Most of my flower planting for the farm goes straight into the ground and critter and soil management consumes a lot of our time! So a top goal for our garden was to add permanent raised flower beds for an added design element at our customer pick-up spot.
With a raised bed, the option to fill the boxes with a combination of soil and compost of my choosing, limit weeds as well as critter-proof with was an added bonus. We had so much fun and ease with building these for the farm that we continued the process and made two more for our back yard while we were at it.

A Guide to Building a Raised Flower Garden Bed
To build these flower beds, I invited my husband to help and, ehem, guide me a bit. He wouldn’t call himself a builder, even though he built our home, our chicken coops and outbuildings and has helped with more remodels than I can count. There is something that is earned and learned with repetition and problem solving regardless of where or how the skills are gained. For the size of the frames we decided on, it really helped to have two of us working together on it. Now I can confidently say that I could tackle one of these frames by myself when or if necessary, though it’s always more fun together!
Getting Started
To get started, we chose to use what we had on hand in our old barn. Piles of aged Spruce rafters of various lengths and some old porch beams that have been hanging around with nothing to do were the perfect pieces for us to put to good use. I love a good repurposing project!
Since space was not an issue for us, the length of the wood we had on hand dictated the size and scope of the bed frames we chose to make. Whether you are building with new material or going with what you have at hand, the options are endless and can easily be tailored to your site and specific design requirements or limitations. And lumber right now is expensive!
Best to not let the cost of the project limit your vision and instead get creative. I’ve seen plenty of clever uses of scrap wood, metal or even pallets. Be resourceful and adaptable with what you have on hand and watch your vision bloom before your eyes.
Materials and Tools for Building Your Bed
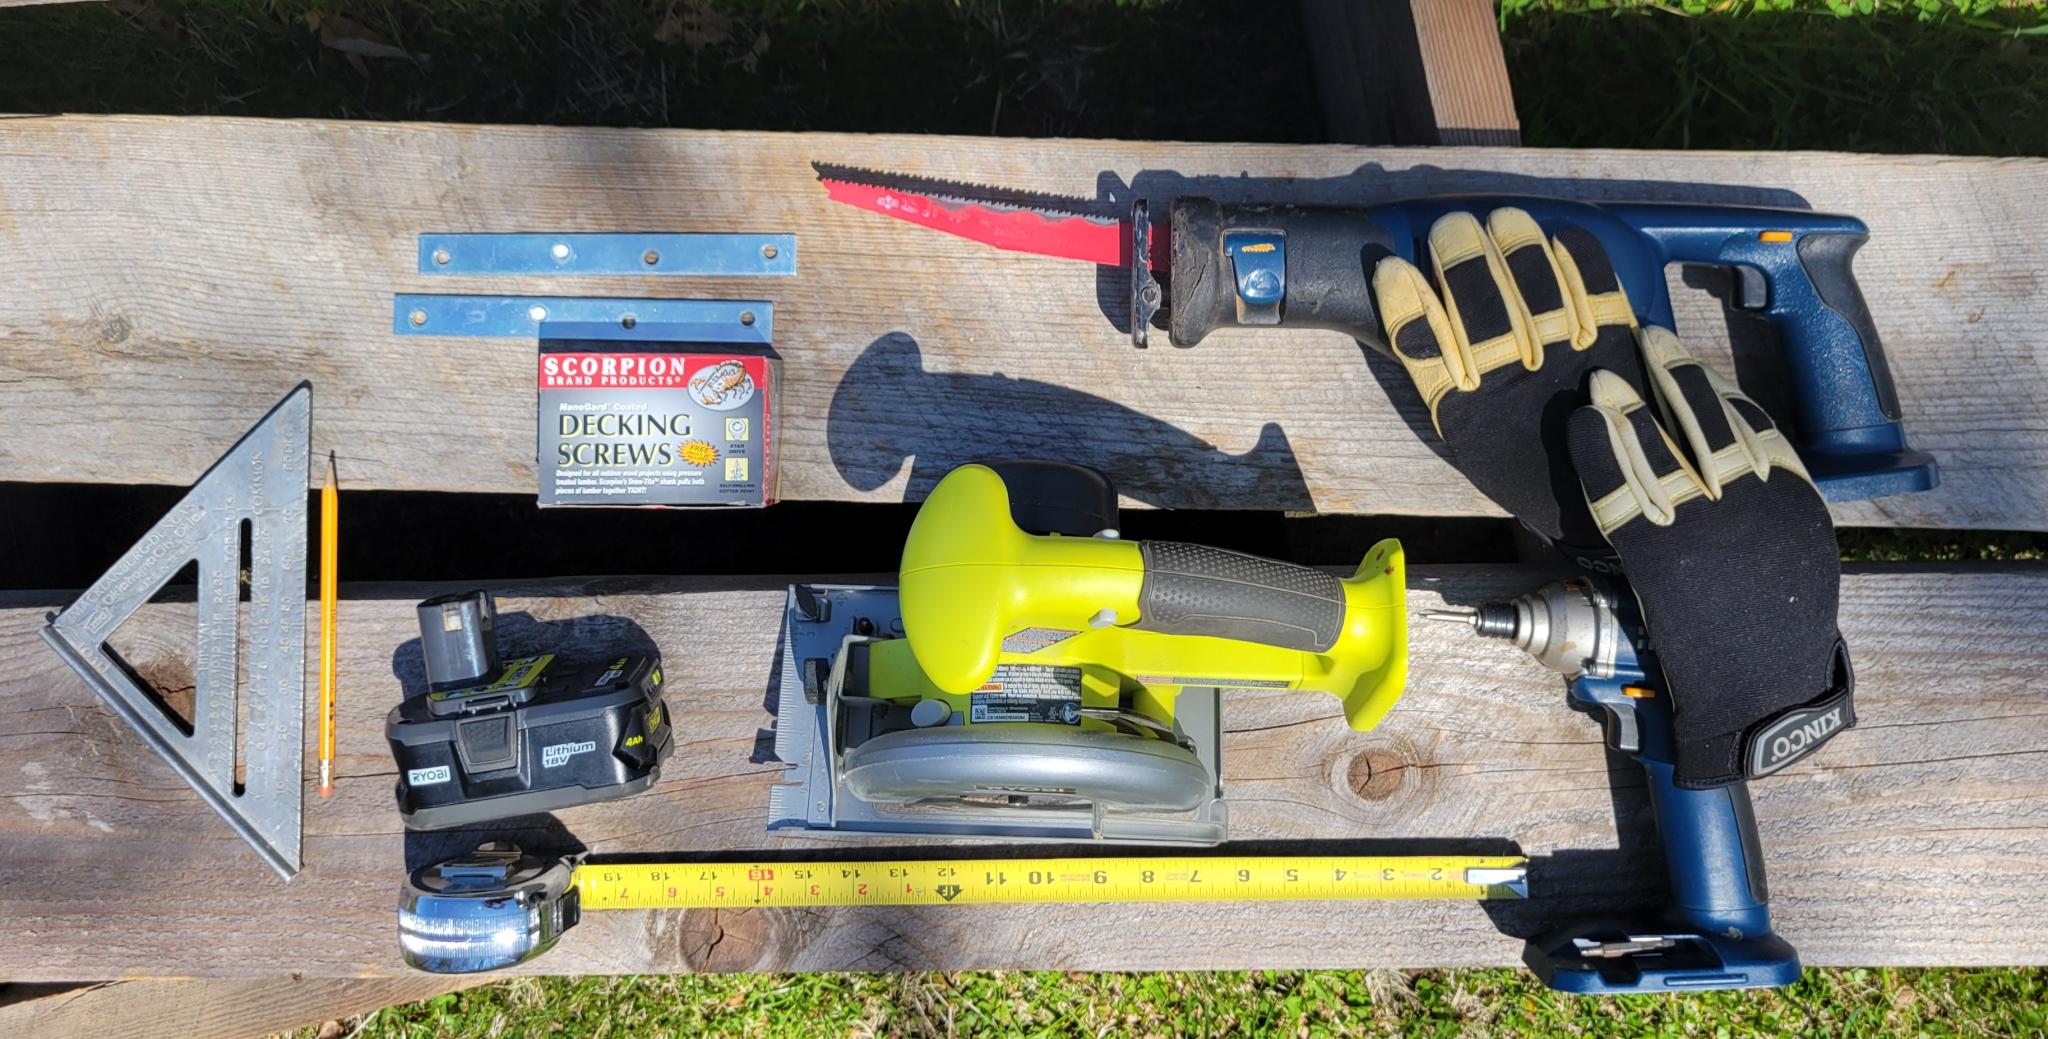
The materials and tools we used to build the flower beds are listed below:
- Safety glasses, Gloves and Ear protection
- Saw (Reciprocating and Circular)
- Drill (extra batteries!!)
- Decking Screws (we used 3” for our wood)
- Tape Measure
- Square
- Pencil
- Stainless Steel Flat Mending Brace (2)
- Lumber (cut to your predetermined size)
- Square posts for each corner (4)
- Optional: Landscape Fabric and Hardware Cloth
Selecting the Location
The location where you plan to place your flower bed is a crucial first step. Paying close attention to the elements of sunlight, wind and water and how they will affect the growth of your plants is important information to know before you commit to a growing spot. I spent a couple of days observing our home site to see where in the yard the sunlight hits at different times throughout the day. I considered the movement of the sun across the sky as the season transitions along from spring to summer since the sun’s arc will change a bit, reaching its highest position in the sky on June 21st, the Summer Solstice. Aiming for a good six hours of sunlight is optimal for your plants growth and is certainly dependent on what you plan to plant. We knew for our growing plans we wanted as much sun as possible.
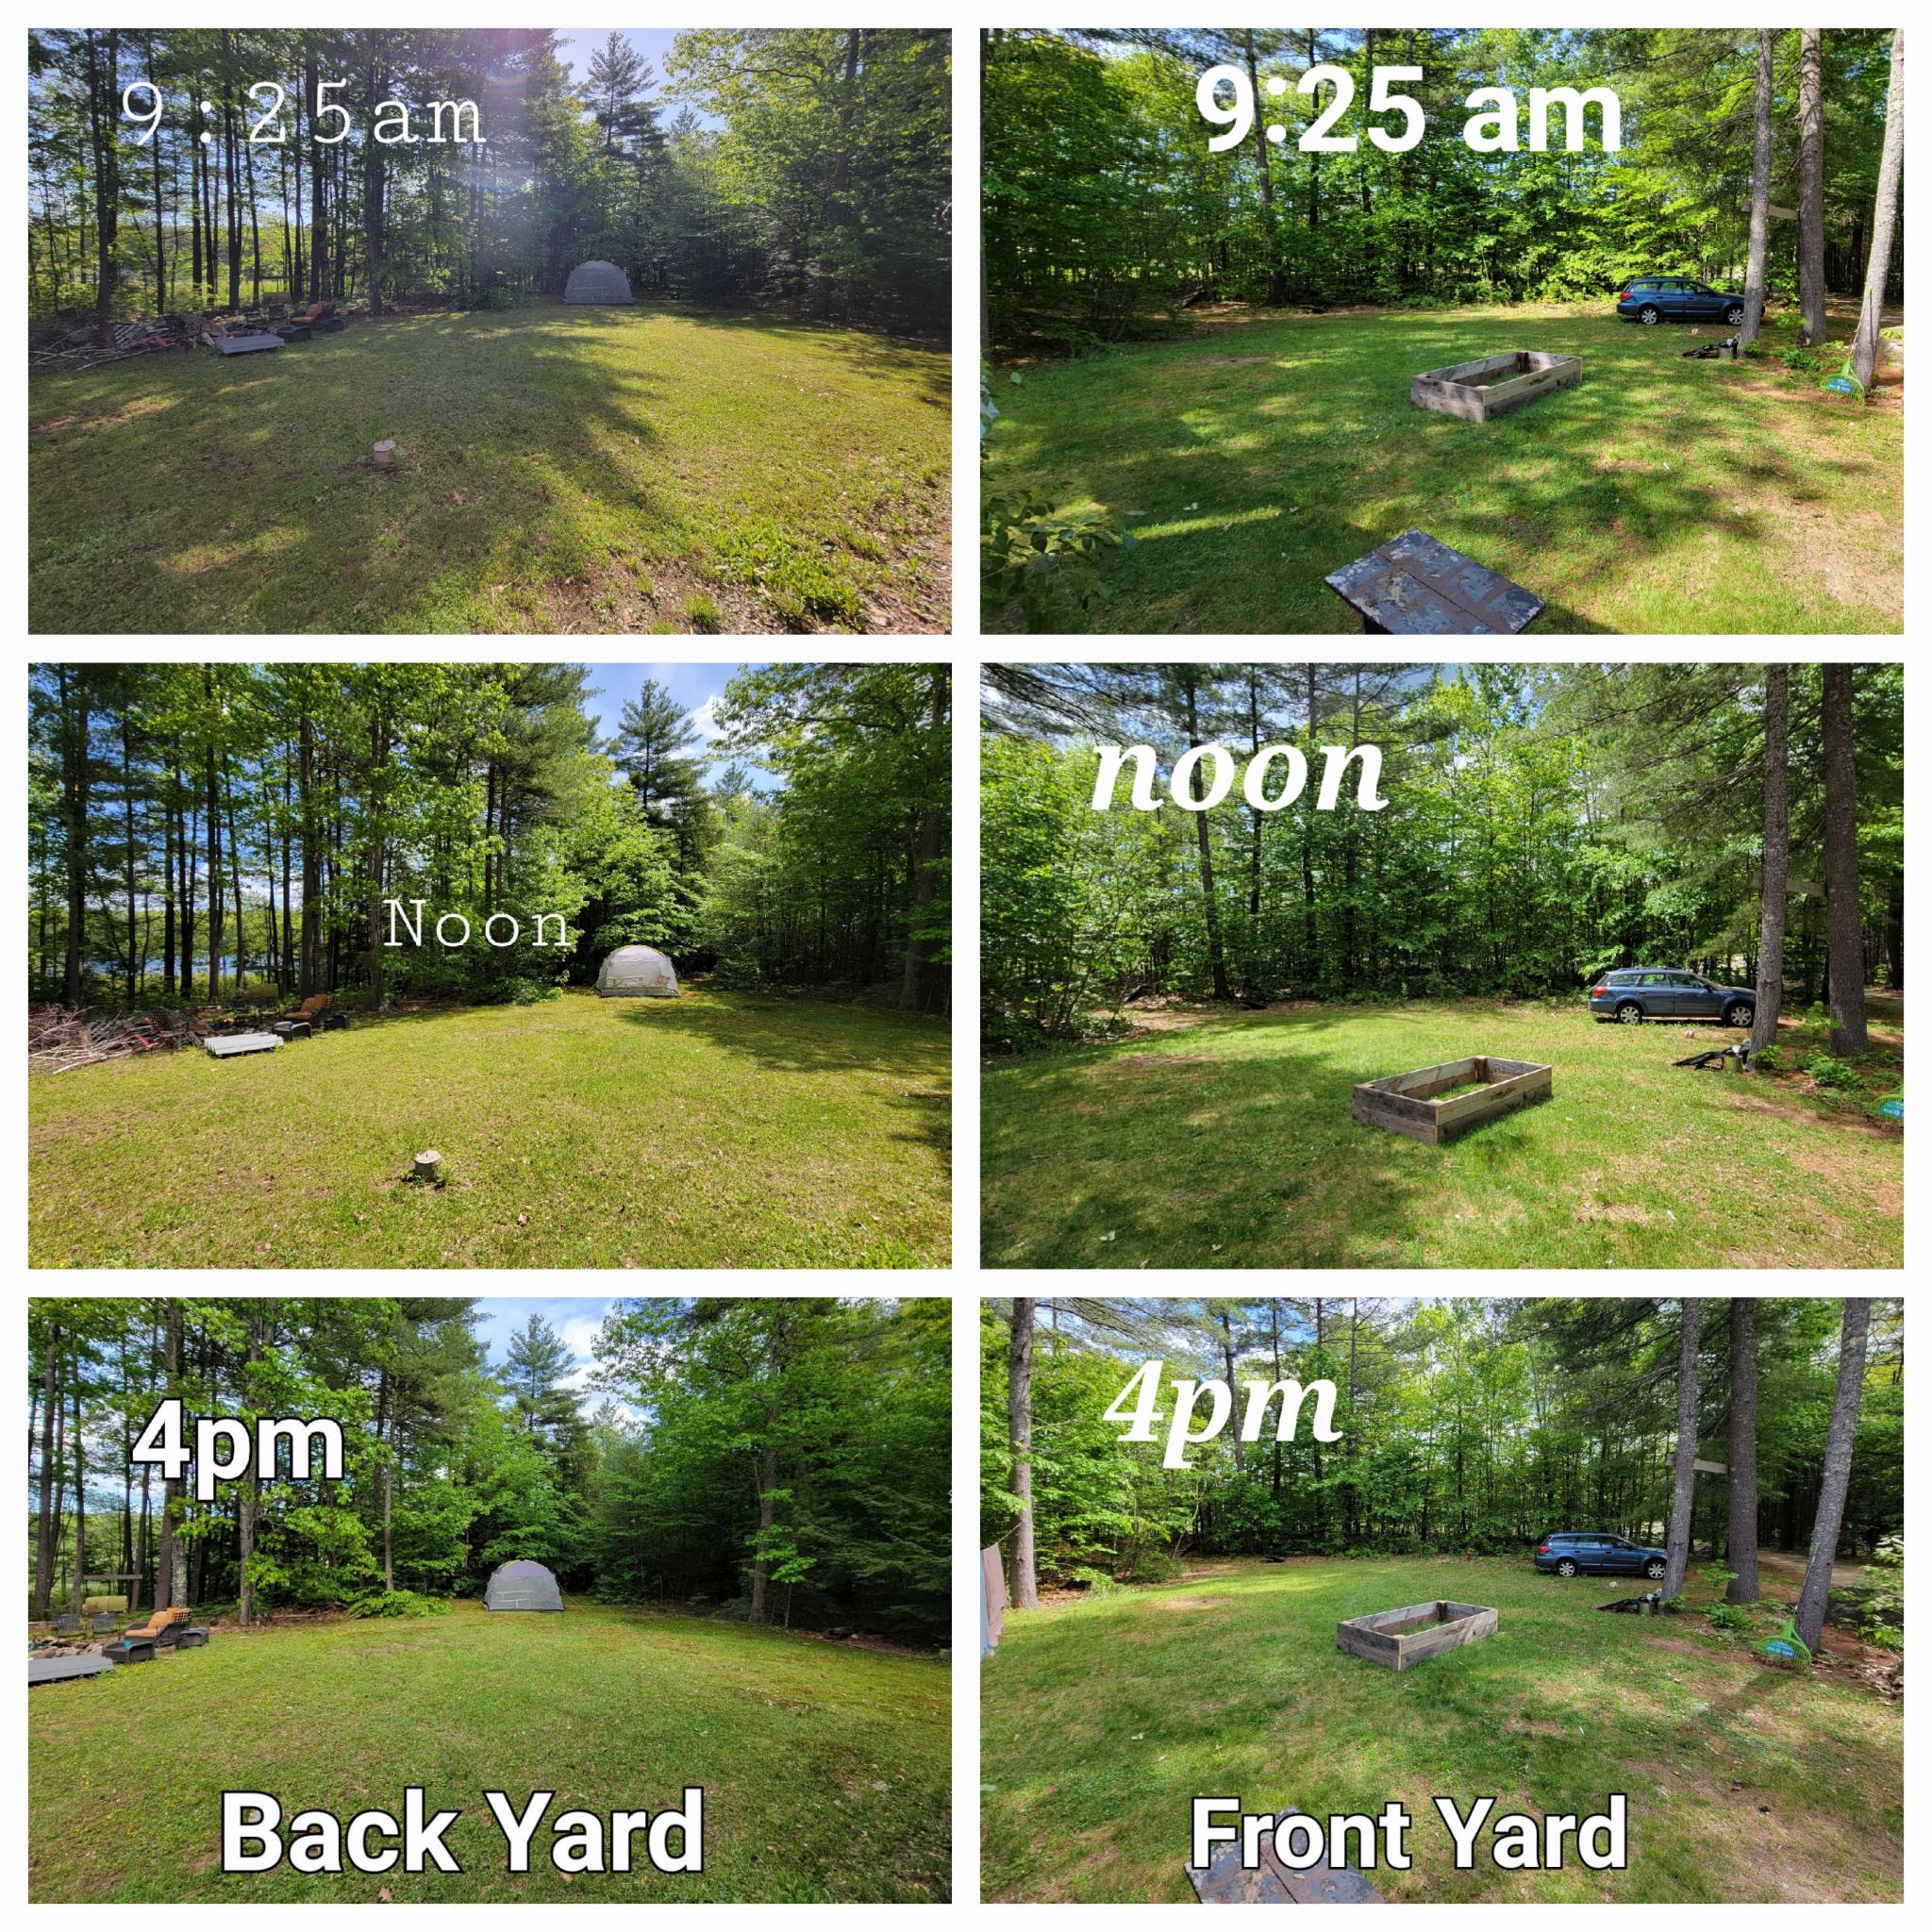
- Sun provides us with the maximum amount of energy between 9am and 3pm in the Northern Hemisphere. By observing your planting spot between these hours you want to be sure the spot is clear and there are no tall trees or bushes that might, “throw shade” on the garden of your dreams.
- Wind in our spot is minimal and since we are focusing mainly on perennials in the flower bed, the most crucial time would be when they are young and just planted. If they can endure enough to get rooted they will anchor themselves in nicely to withstand a bit of breeze that will inevitably blow through.
- Water gives life to plants and people. Newly planted seeds, starts or even established plants will require a certain amount of water to help them get started, and not just survive but thrive. Considering what your water access upfront is can help you determine if your site is optimal and set you up for easy watering. It can be as straightforward as a hose that can reach your garden bed, a watering can or even strategically placed rain barrels that collect run-off. Having a steady water source is essential to healthy plants and ease of watering, or at least having a plan, will ensure your plant babies get what they need.
Visualize Your Plan

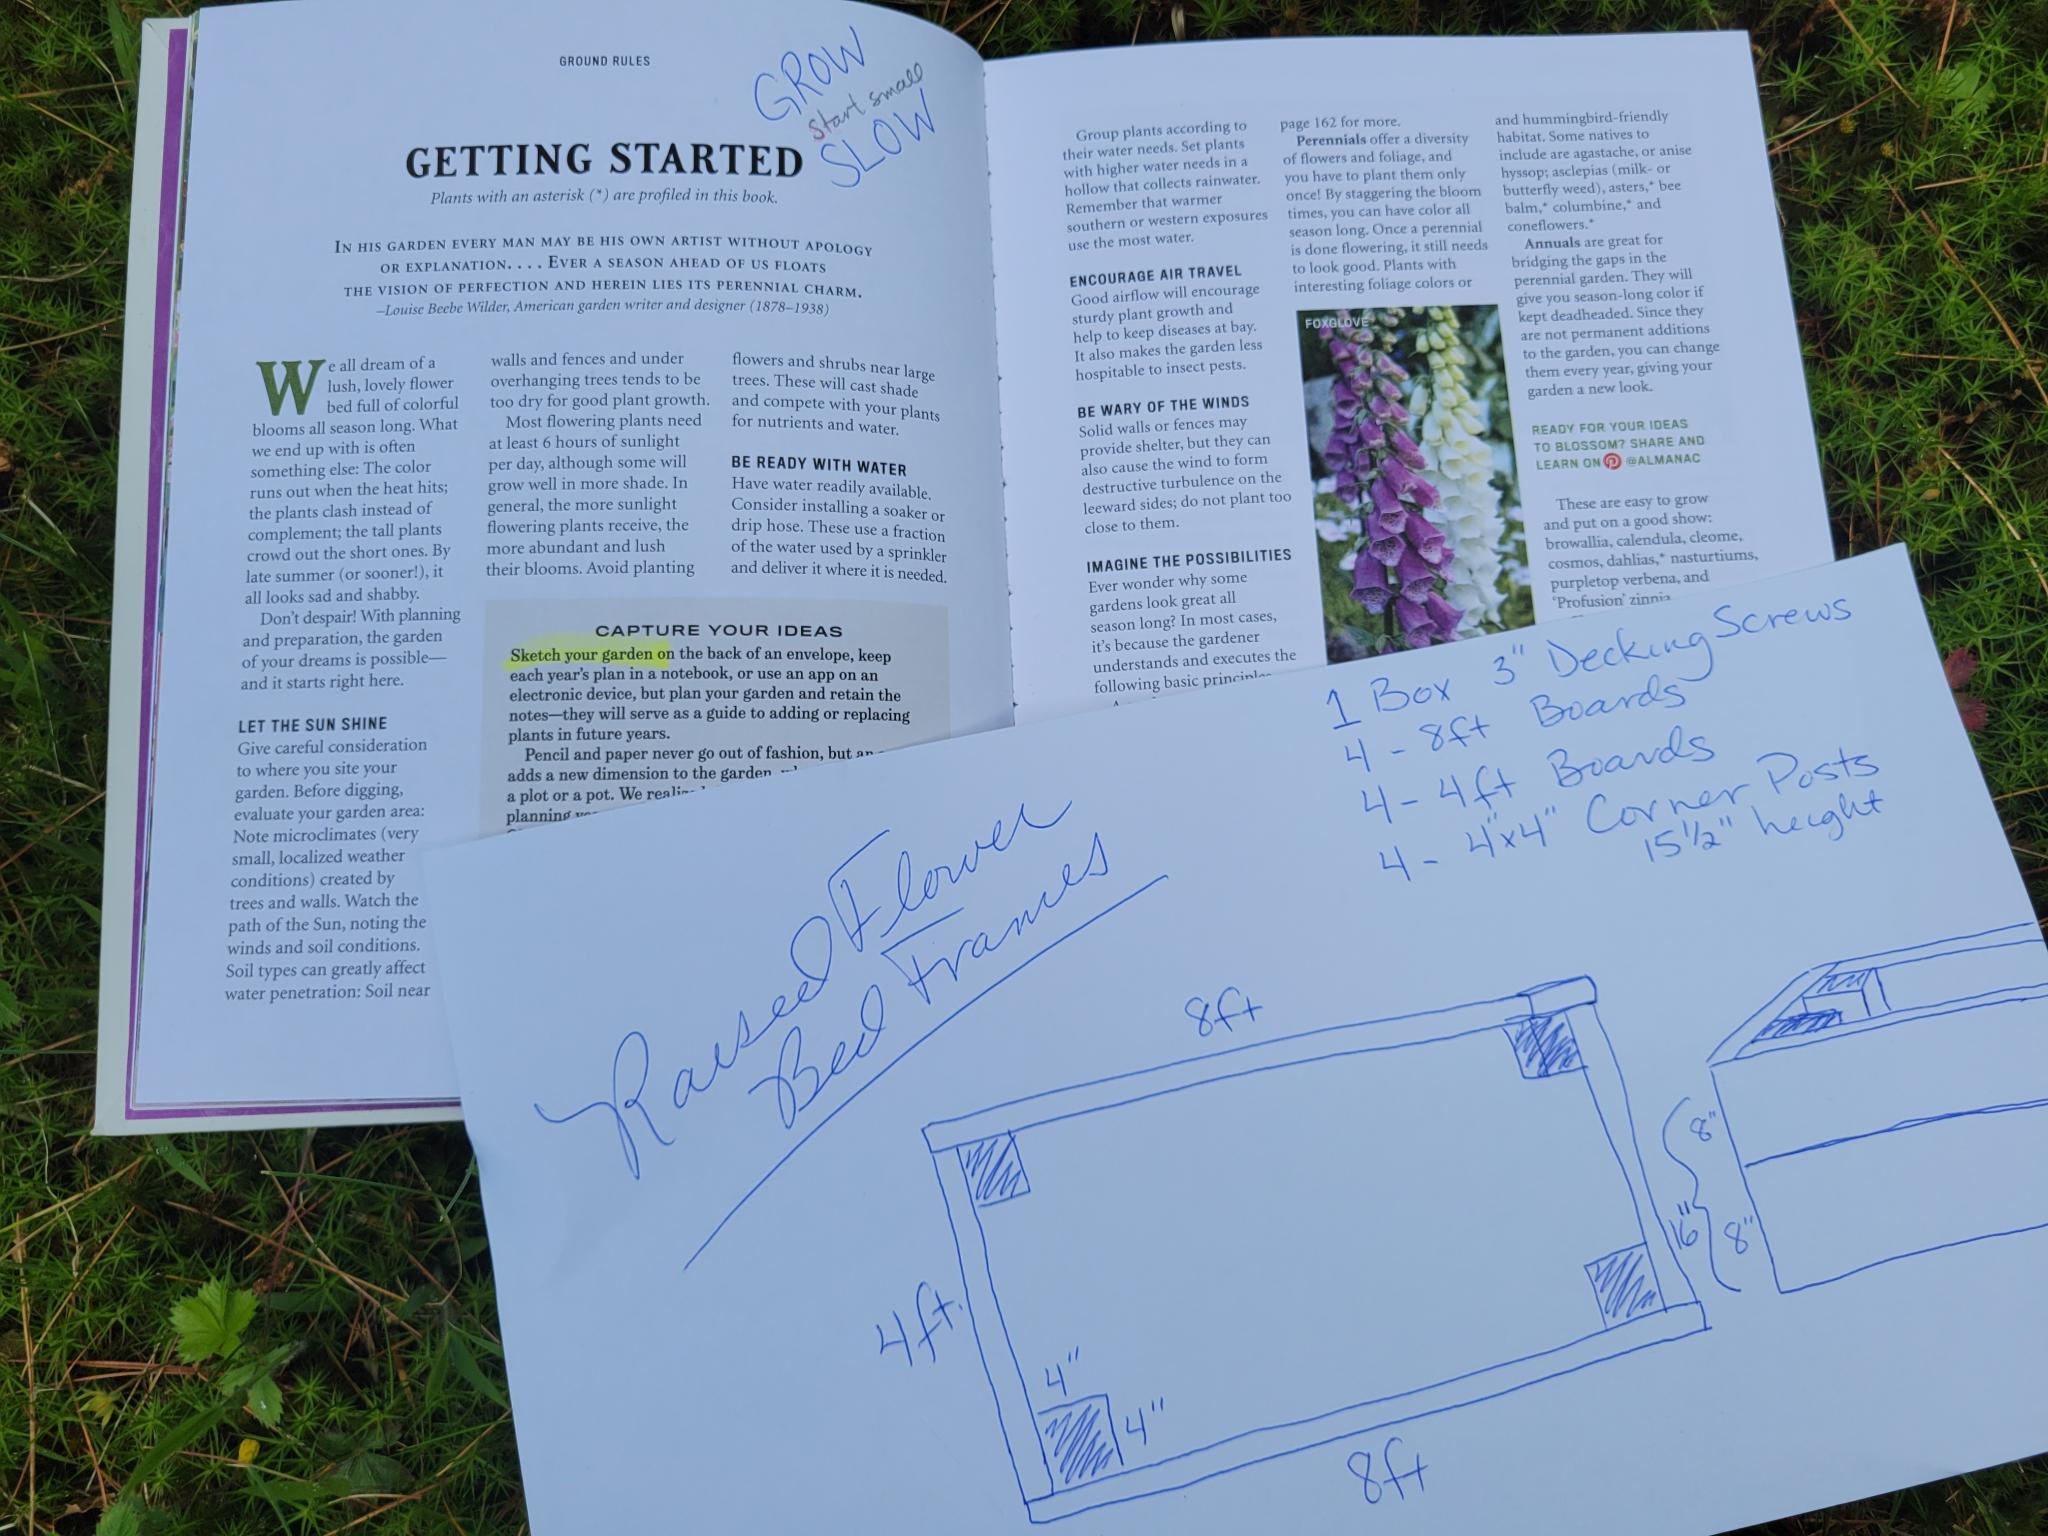
I am a visual learner. Perhaps that is also why I like to see my thoughts placed onto paper. Tell me and I’ll forget. Show me and I’ll remember. Drawing out an image, however stick-figured, chicken-scratchy it might look, might just be a helpful visual for you too. Starting with a drawing of the frame that I have in mind and adding onto it the lengths that we are aiming for makes an easy visual to-do list appear before me serving as a helpful reference.
For this project, we used what was on hand and allowed that to determine what our size would be and were able to cut exactly what we wanted. The older boards we are using will also give more of a well-worn look to our frames which will match our rustic farmhouse aesthetic as well. A few thoughts around sizing have taken shape over the building of these four raised beds:
- Buying Lumber: If you are purchasing lumber and calculating the total length or width that you will need it is important to remember that nominal lumber (2x4, 2x8) is true to that number in name only. The actual dimensions are less than that due to the process of being planed smooth, on all four sides. It is possible to minimize the boards you need to purchase by knowing the total dimensions needed ahead of time and preferencing board length based on maximizing what you can cut from a particular length of wood.
- Length: The boards become too heavy if too long. I would suggest building the frame no more than 8 feet in length. Once constructed, you usually have to pick up and move it to its final position. If you are going for a longer bed size it would be easy and look nice to split up the area with 2 smaller beds for a visual break.
- Width: You want to be able to easily access the flower bed from both sides. Four feet is the optimal width to work with. Any longer than that and unless you have super long arms, there will be a space in the middle of the flower bed that will require some extreme yogic stretches to access, if possible at all. Keep it reachable!
- Depth: Planting depth of 11 inches is common for raised beds and adequate especially if you leave the bottom open so that prolific and hearty roots can reach down into the ground below. That depth usually correlates with using (2) 2x6 to make the frame. Certainly, plant root depths vary based on what is being planted and anywhere from 11 inches all the way up to a standing raised bed to accommodate planting while standing or set to a height for accessibility in a wheelchair. The beauty of making your raised bed is that you can customize it to fit your specific needs and wants.
Prepping the Lumber
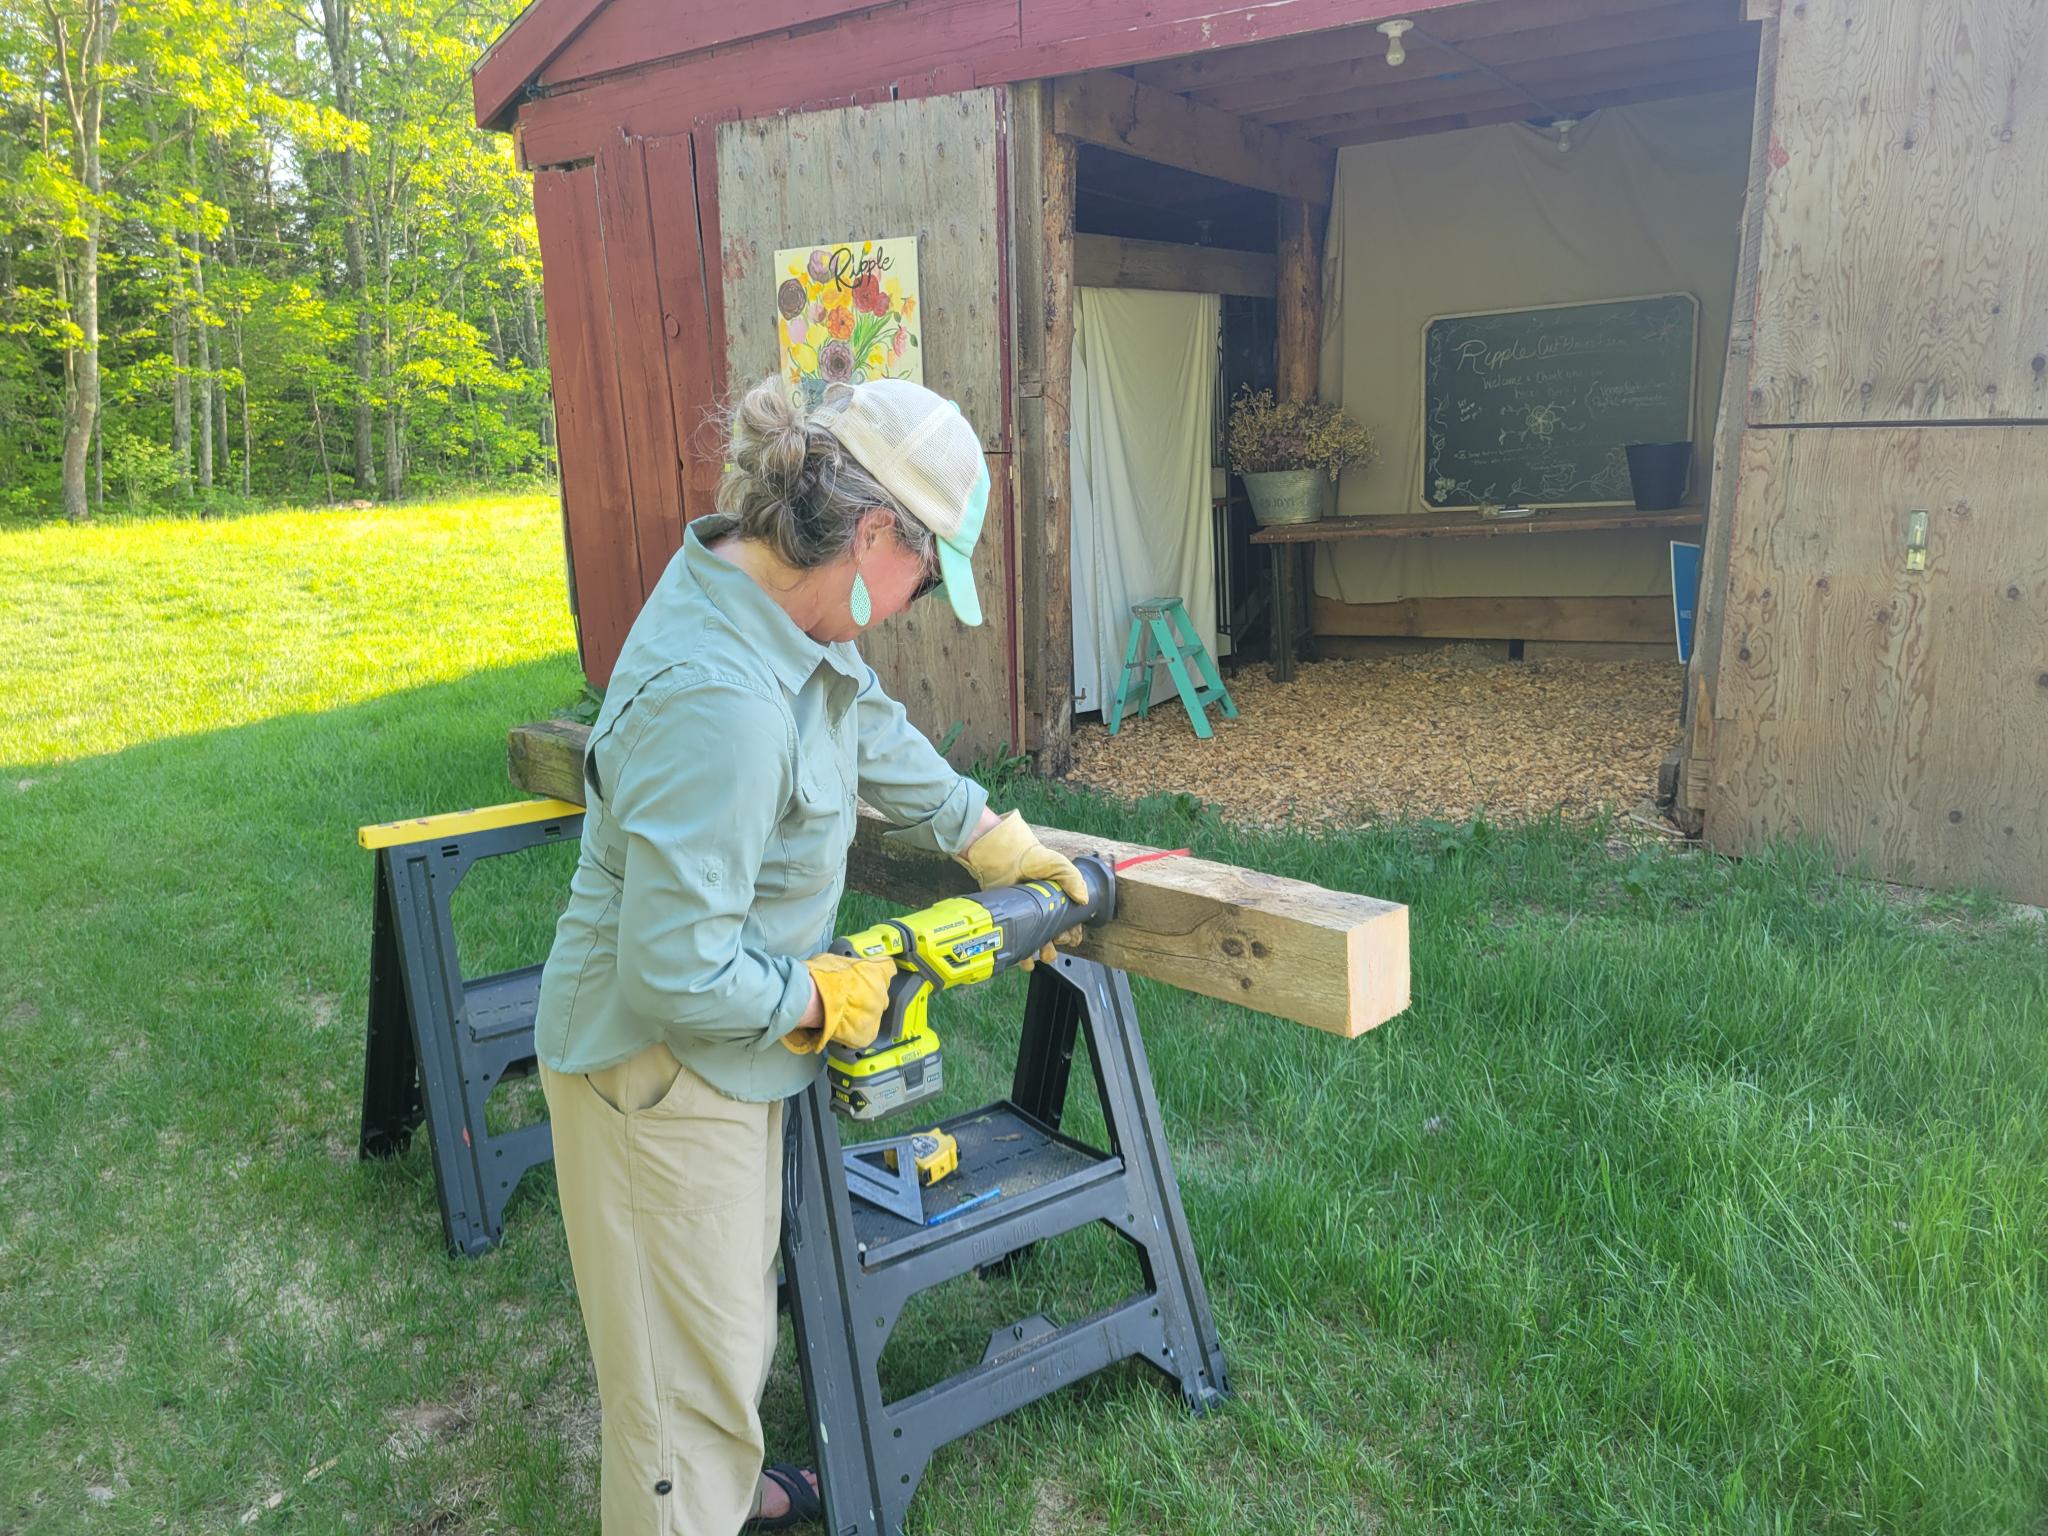
Next step involved cutting all the pieces of lumber into proper lengths. If you don’t have access to tools or the interest in doing this yourself, many lumber yards will pre-cut lumber to length for you for a small fee. We used a circular saw and a reciprocating (Sawzall) saw for the cutting we did at the barn. We made all four of our bed frames at the barn site and then transported two of them home. In the future, we will make in place because they get heavy!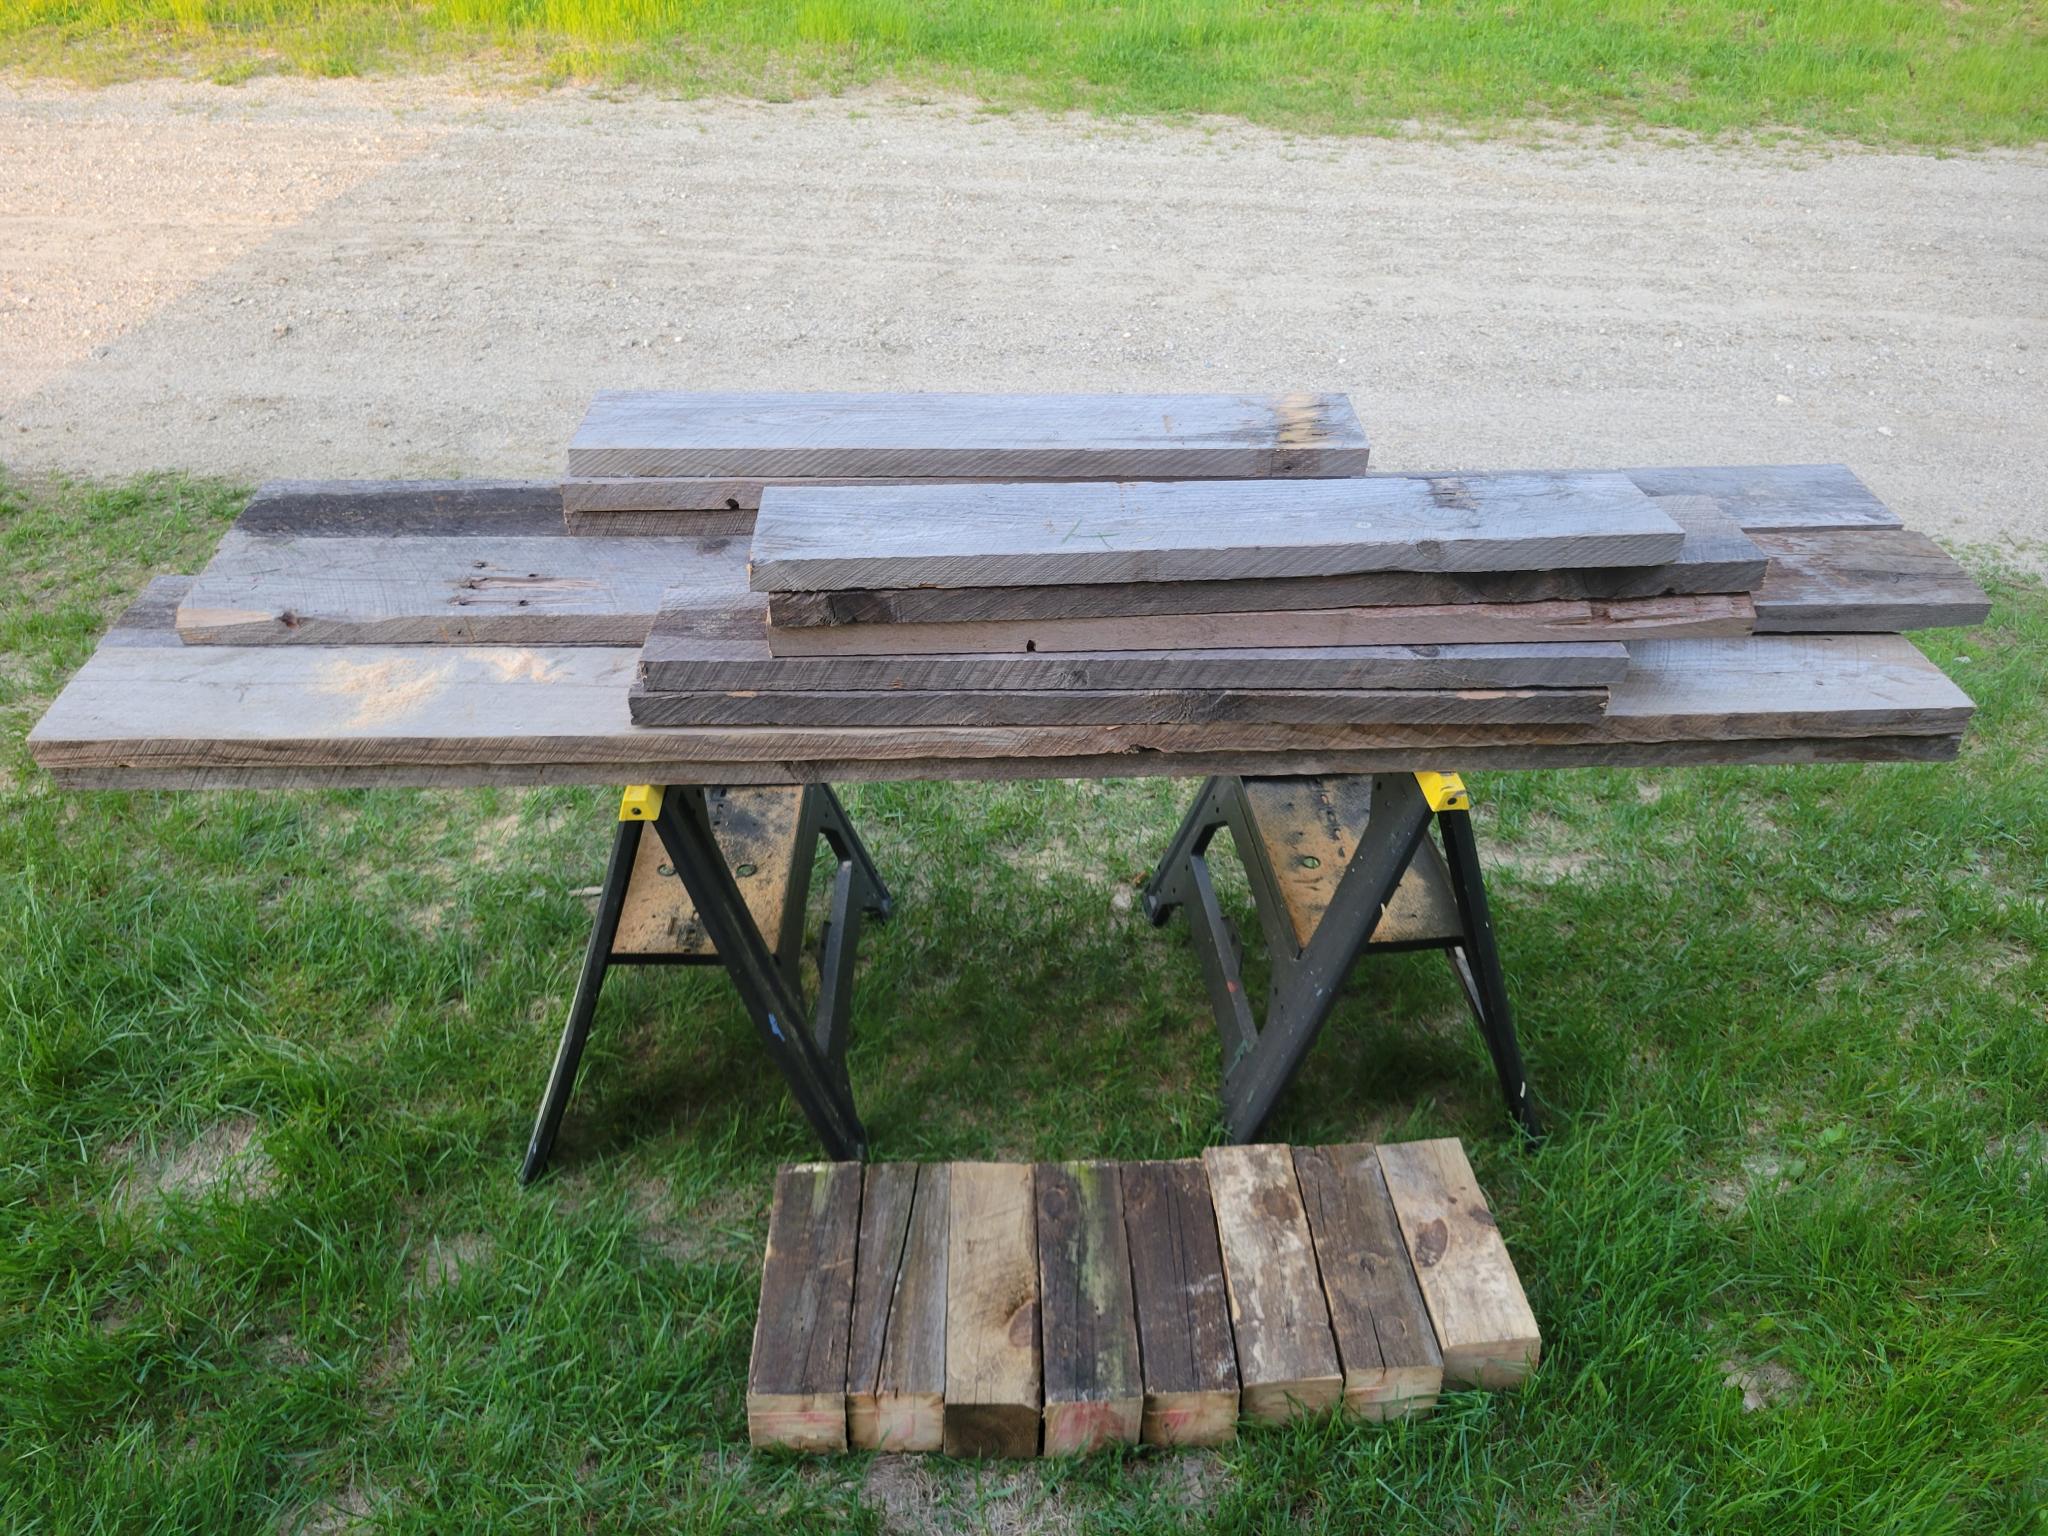
Depending on the heartiness and durability of the wood that you use you might want to seal the inside of your wood with a food-safe sealant or plastic lining to help prolong the life of the raised bed frame. Before assembling is the optimal time to do that while the boards are up on sawhorses at a painter-friendly height, and easily accessible. As we age, the more we appreciate trying to work smarter, rather than harder and try and save our backs from unnecessary bending. Be sure to find a non-toxic, food-grade sealer that will not leech into the soil, or harm your plants, especially if you might also choose to grow vegetables or herbs in and along with your flowers. I have also seen examples of lining the beds with plastic as an added protection to the wood to help extend the life of the frame. Whatever you choose to use, be sure to avoid any pressure-treated lumber as that is definitely not a safe option.
We chose not to line or seal for this project. Given the wood we are using, we figured a life-span of 5-7 years might be what we will get and we are okay with that. Crossing my fingers we chose wisely.
Bringing It All Together
After marinating ourselves in bug tick spray, we took to assembling the four wooden flower bed frames. Having all the wood cut and prepped ahead of time and the tools at the ready made for a quick assembly process. Be sure to work on a flat surface whenever possible to help keep your build square and level. Below is our step-by-step process that we seemed to hone-in on as we got to the third and fourth one. As they say, necessity is the mother of invention. Nothing like a sore back and swarms of dive-bombing, hungry mosquitos to put a jump in our step and cause us to think smarter and faster, rather than harder. By the fourth, we were a well-bug sprayed, flower frame producing machine.
Step 1.) Set two 4 x 4 square posts down onto a flat surface or onto your sawhorses. Top those with two of the 4-foot boards side by side, flush with the end of the 4-inch square post. Attach each board at each end with (3) 3-inch decking screws.
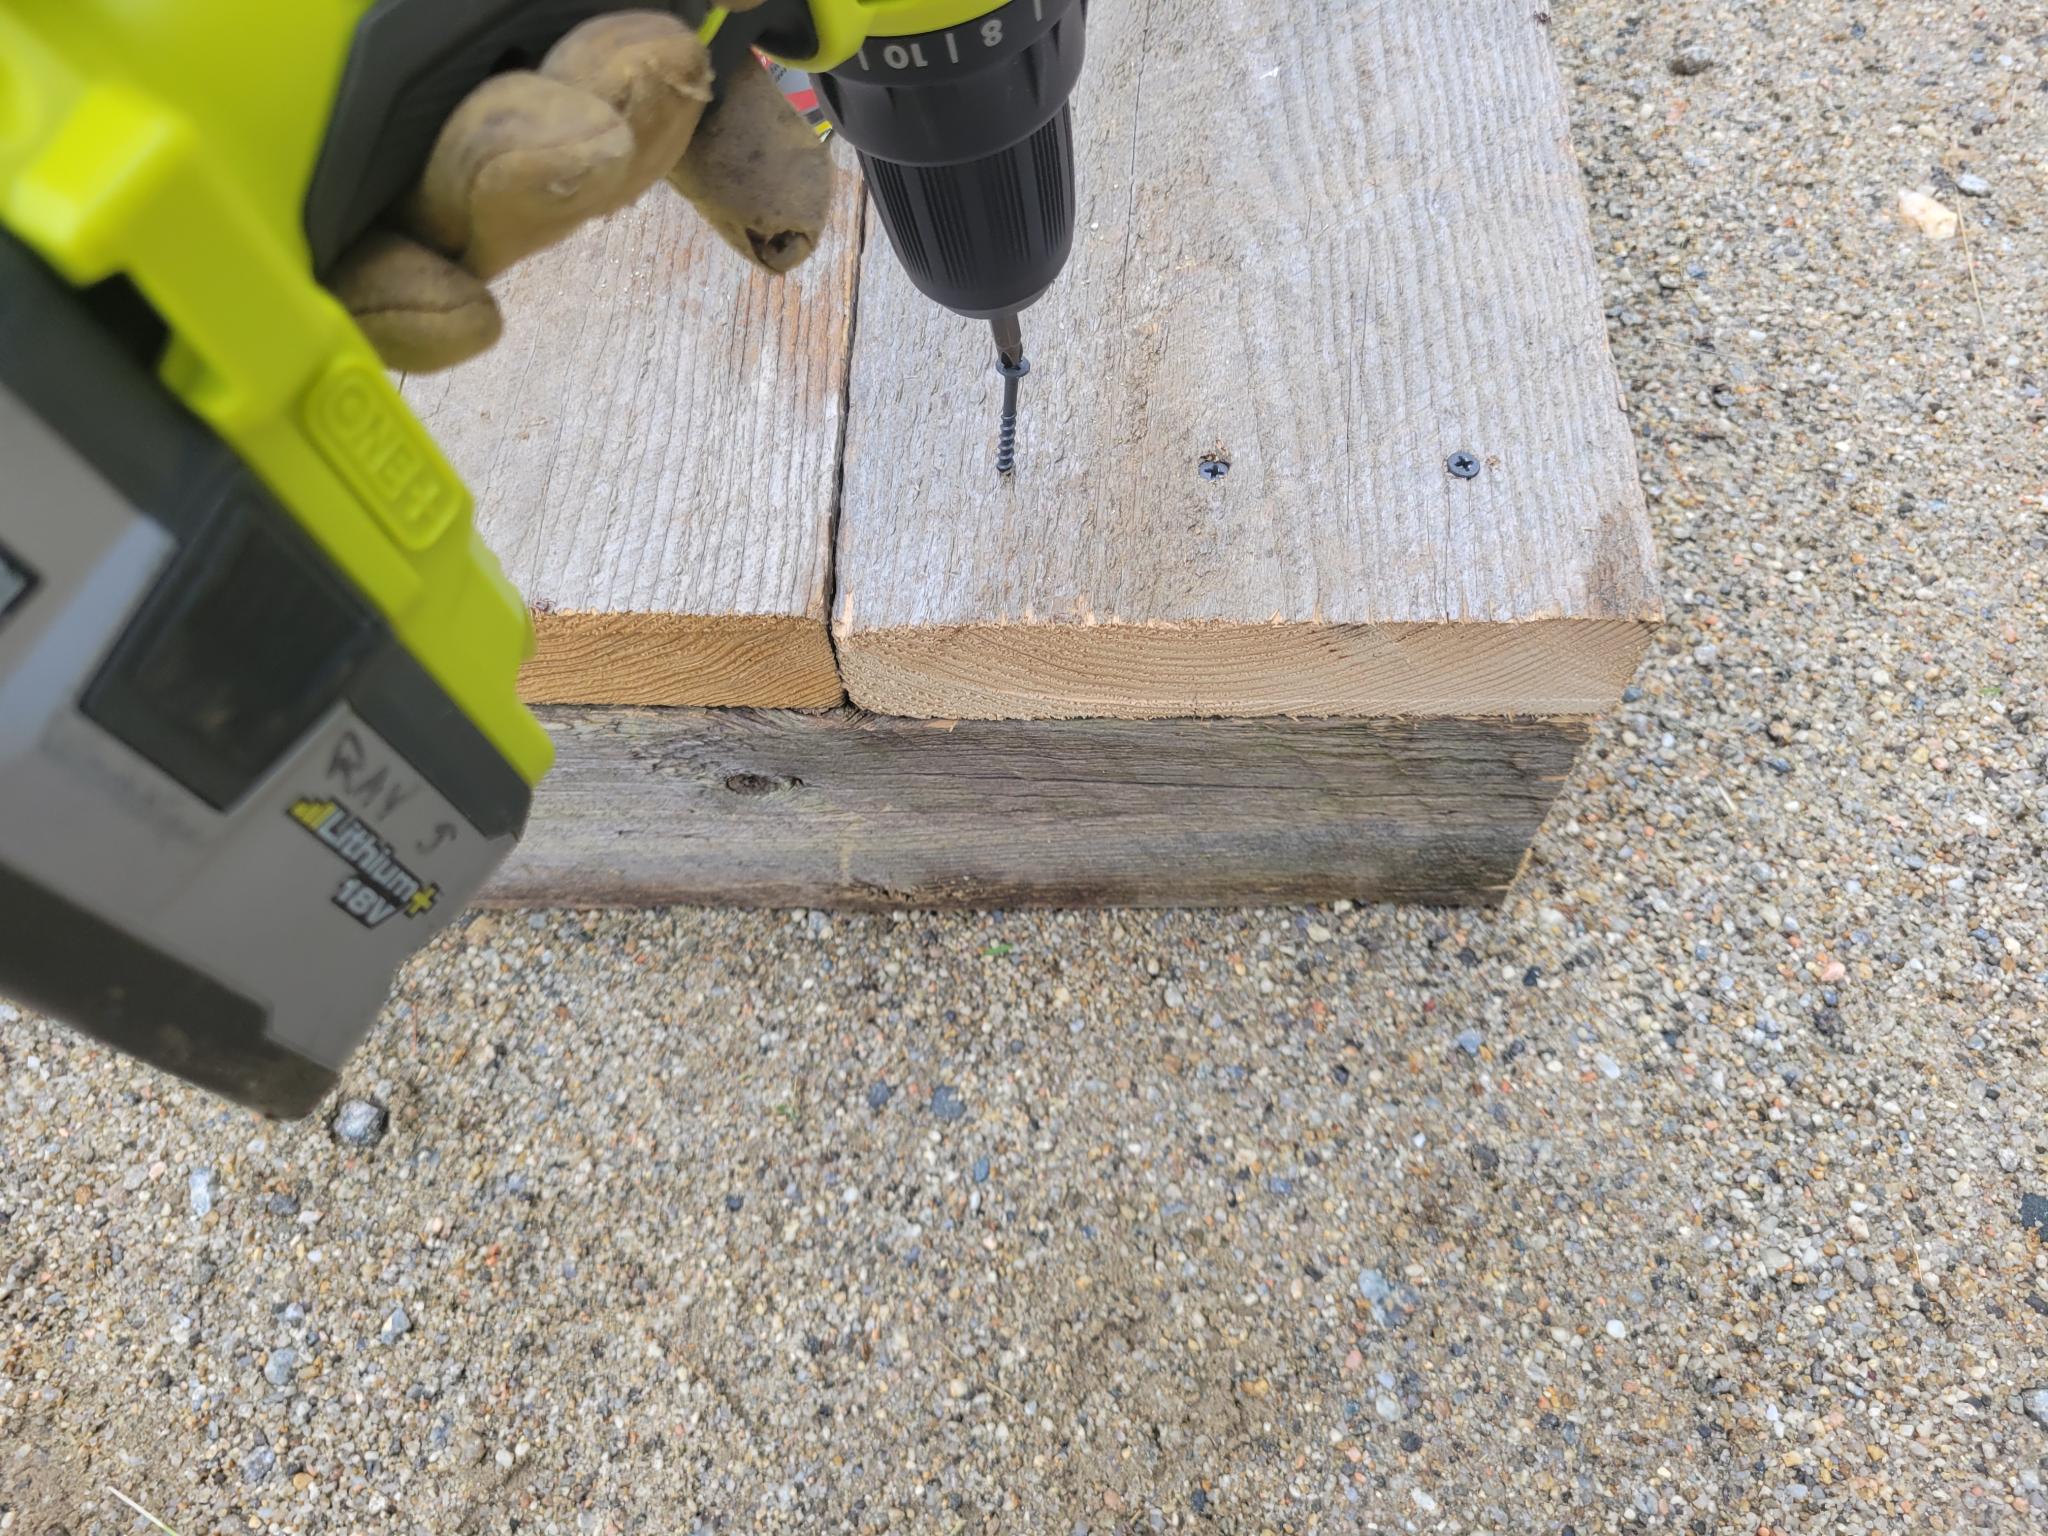
Step 2.) Repeat the above process with the remaining two 4-foot boards.
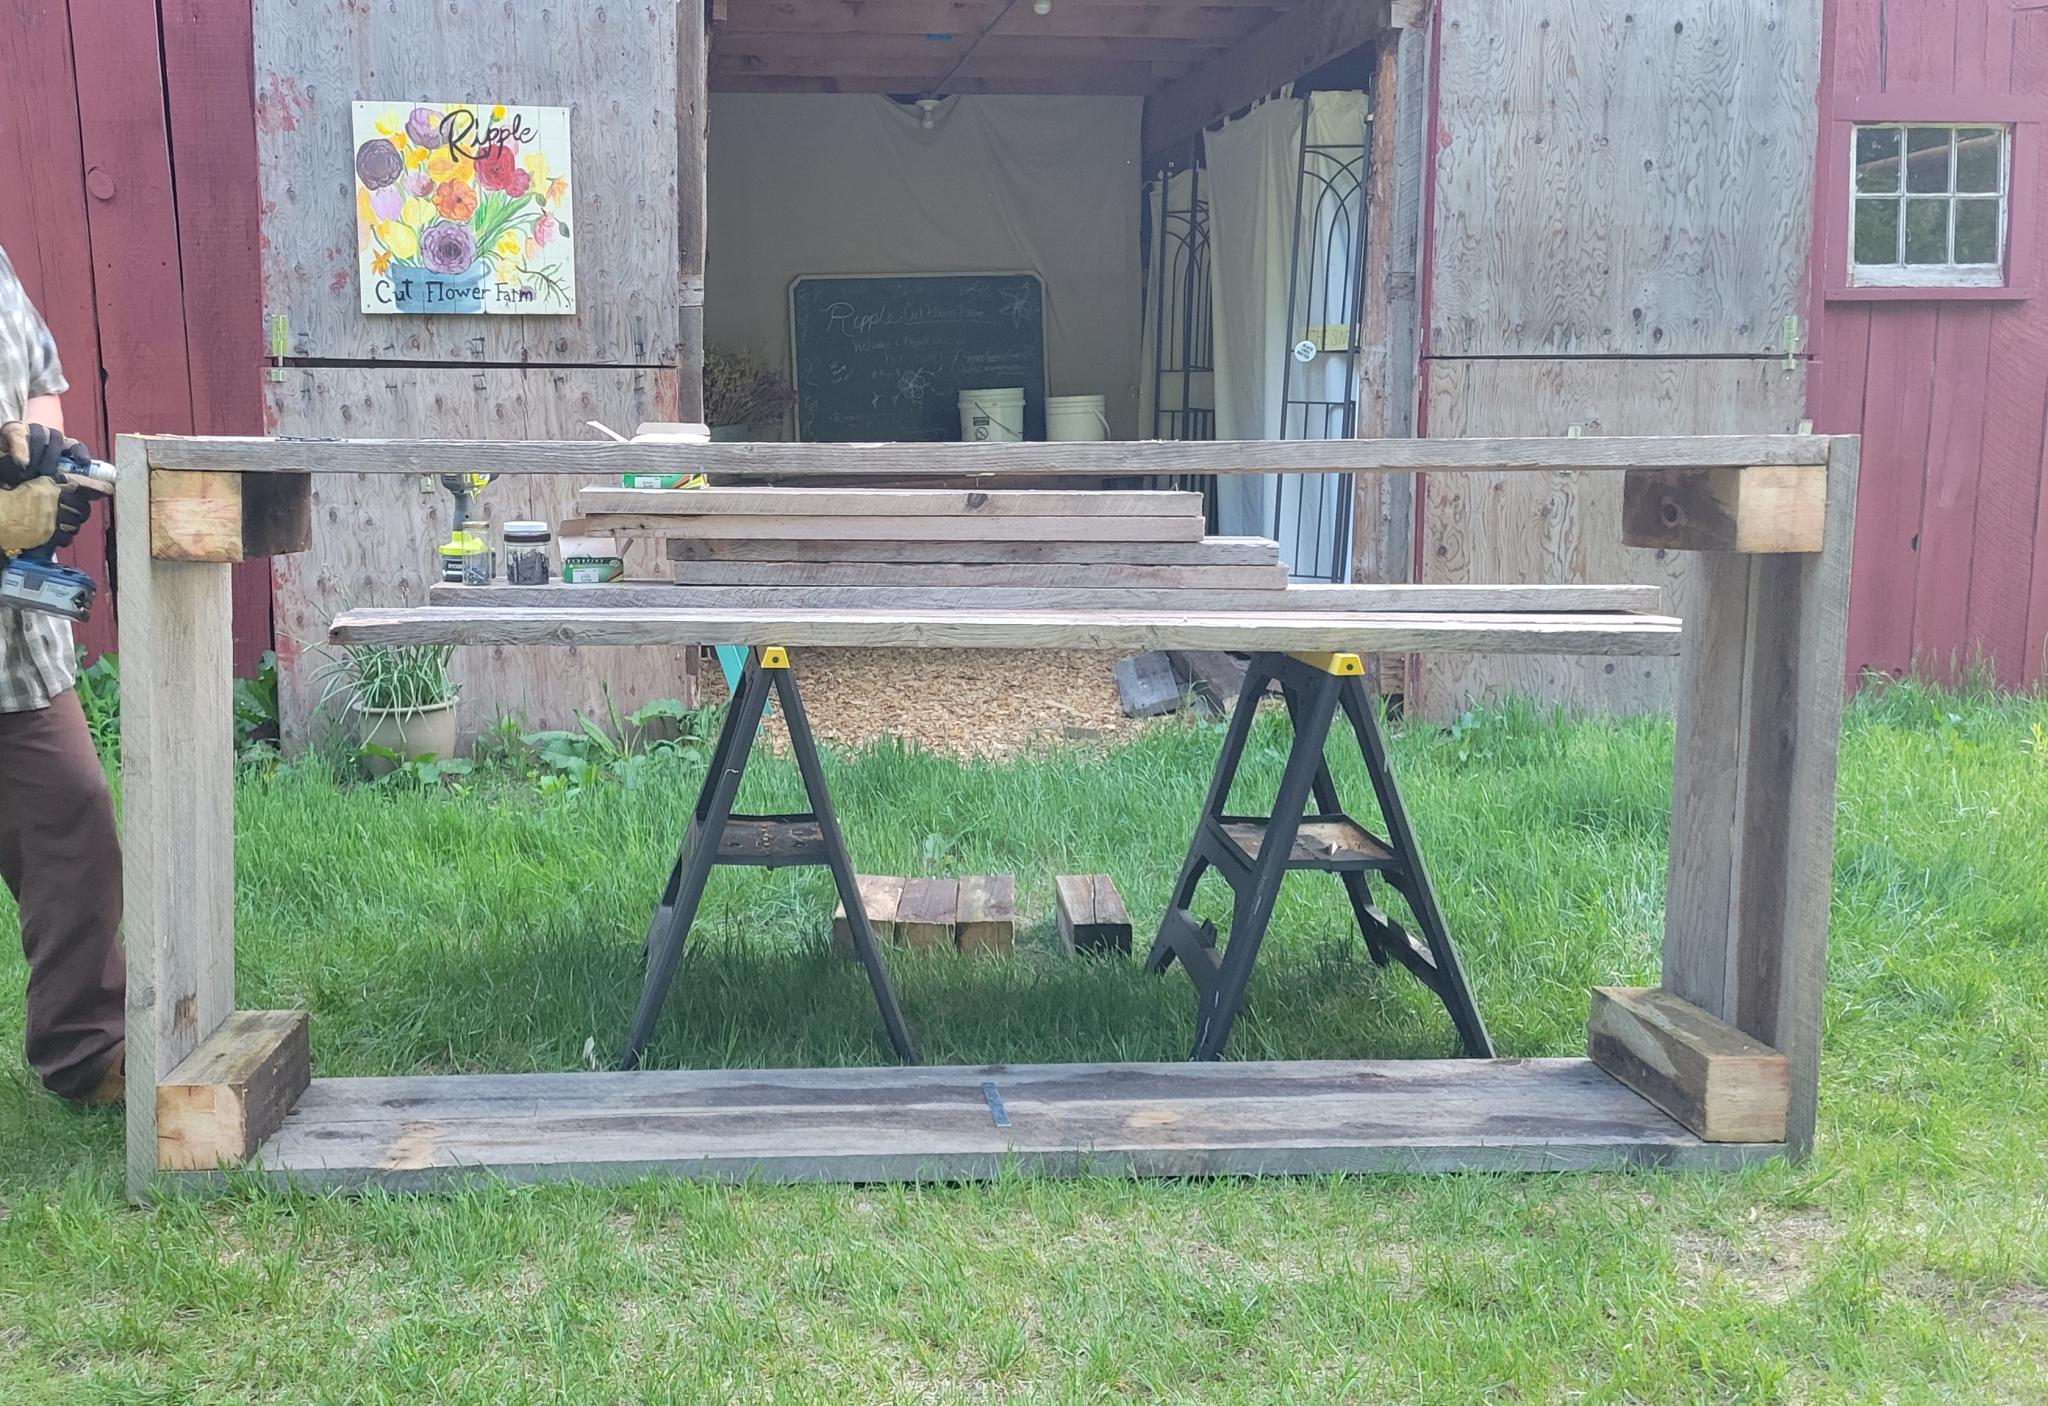
Step 3.) Set the short ends you just assembled up on end, vertically, on your flat surface. (We realized after the first one that working up on the sawhorses really saved our backs and made sure to adapt our build with this in mind.) Place one of the 8-foot boards on top. Attach with 3-inch decking screws. Do this for both 8-foot pieces making sure all ends are flush and tight.
Step 4.) Next, lower down the 3-sided frame from the sawhorse onto level ground. Place the 8-foot board side down on the ground, forming an elongated “u”, with the opening on top.
Step 5.) Place the last (2) 8-foot boards on top of the square posts. Check that ends are flush and go ahead and screw together with your decking screws. Repeat this process on the last end. We also chose here to add mending braces since the older wood we were working with is not totally level. We screwed one for each side on the 8-foot length sides to pull them level with one another.
.jpg)
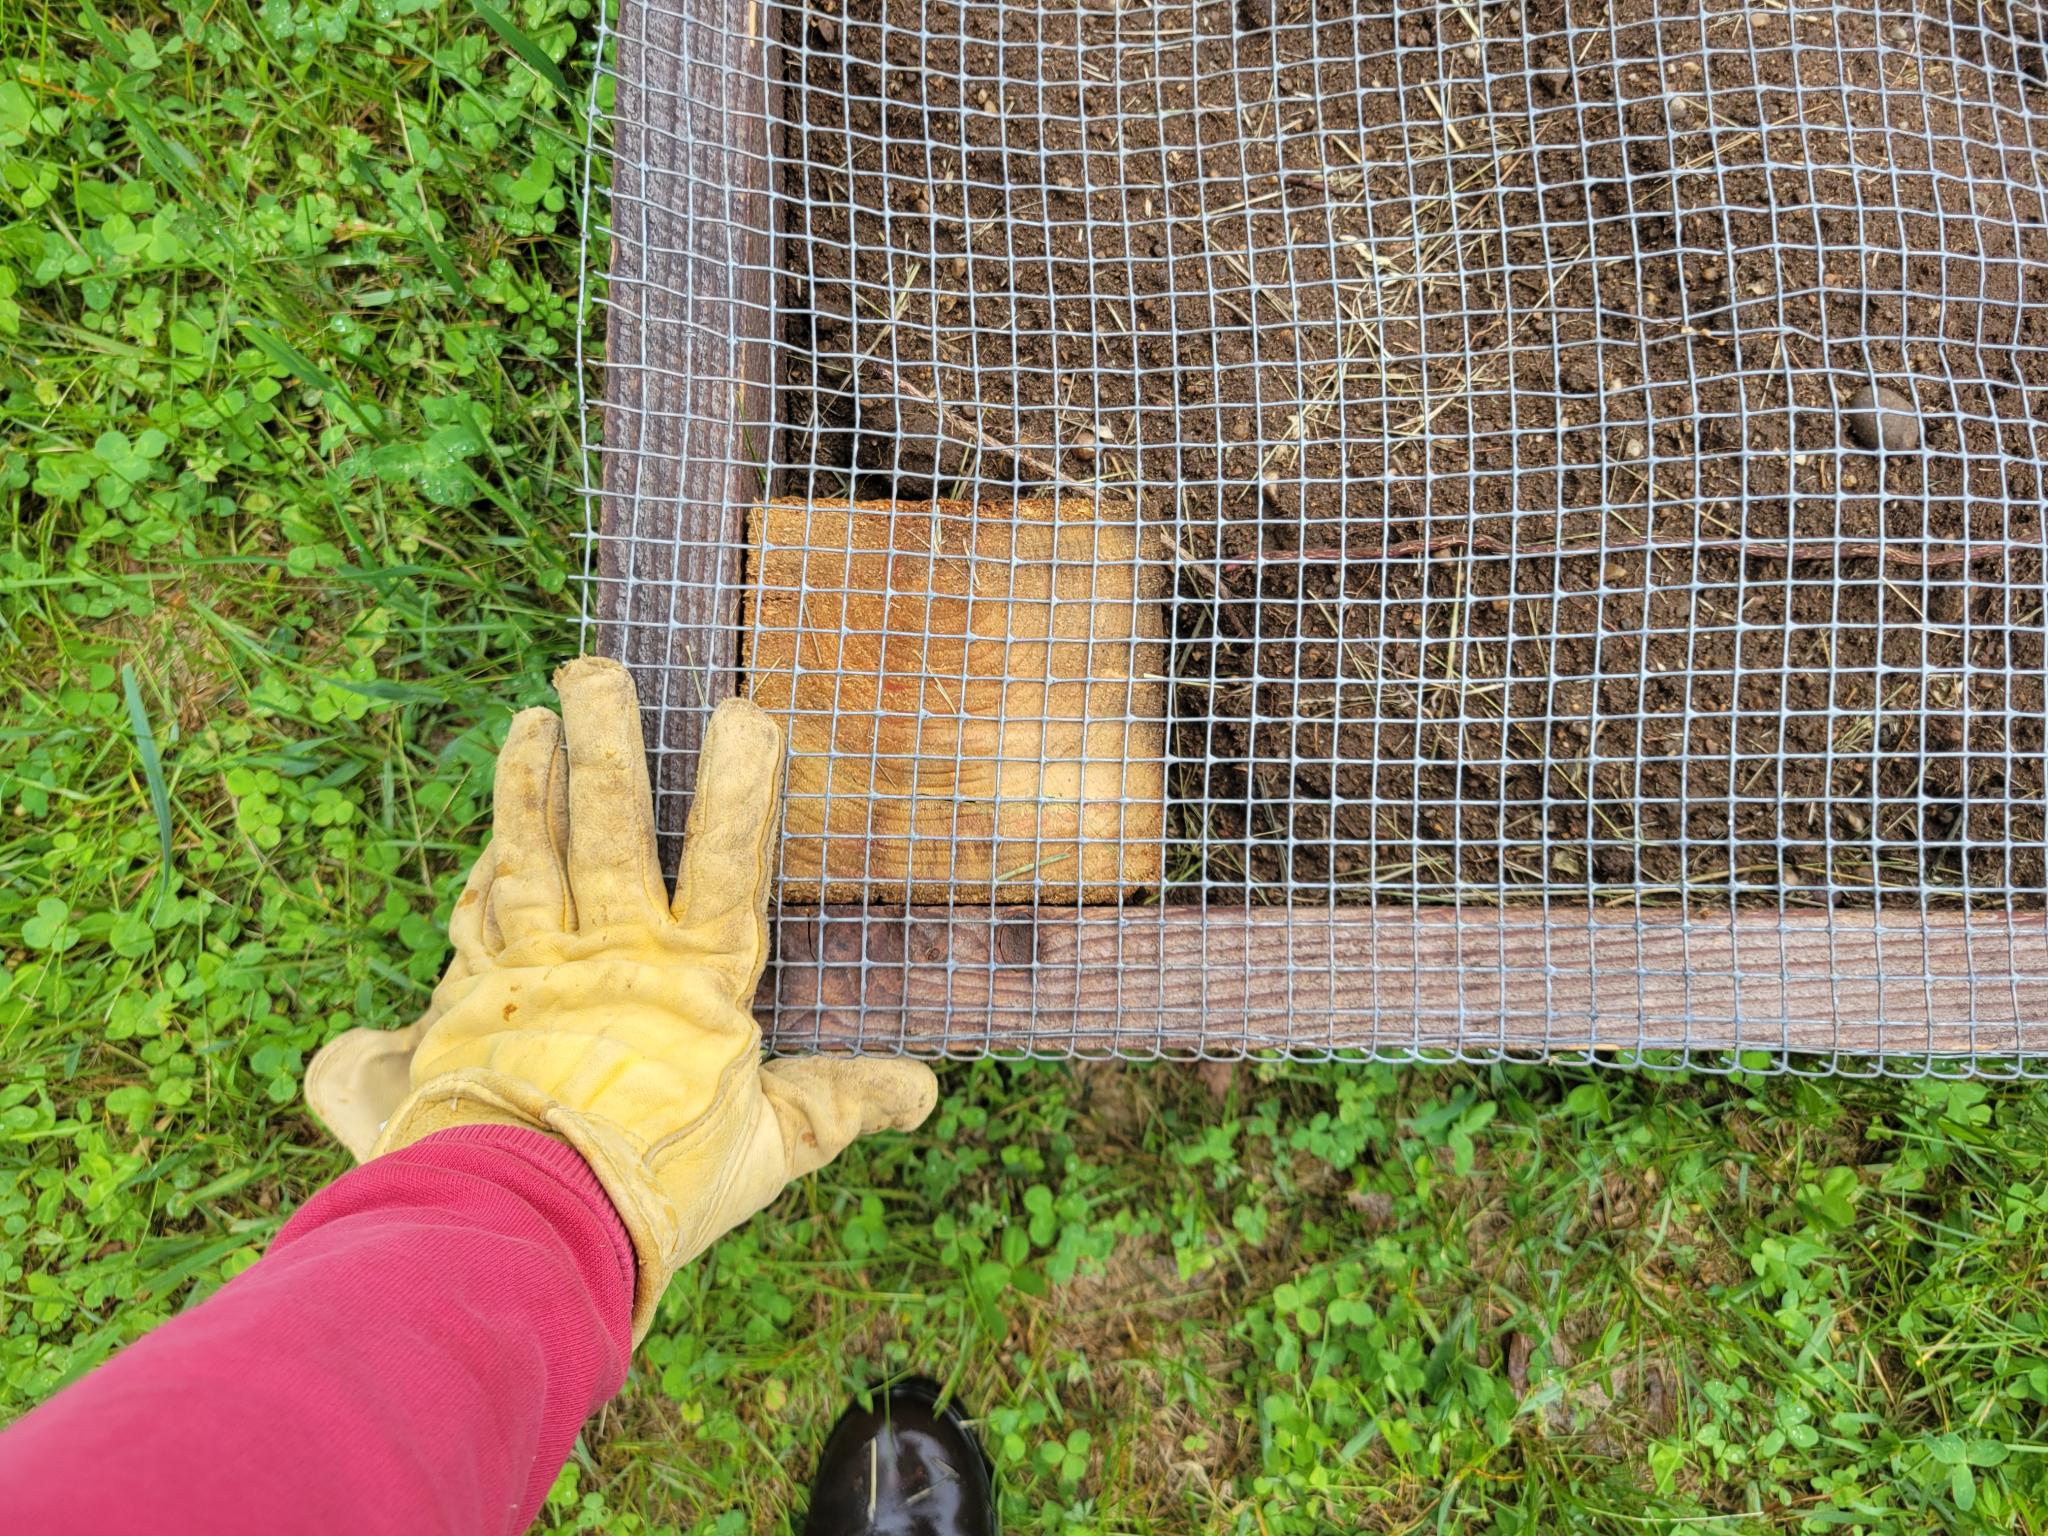
Step 6.) Optional: With your frame complete you can attach landscape fabric to the bottom if weeds are persistent at your site. Simply cut and staple onto the bottom of your frame before you move it into its final place. Secondly, if voles or other critters are persistent, you might want to add on a layer of hardware cloth to the bottom of the frame. Simply measure to fit and adhere using a staple gun.
Ta Da! Now to move your flower frame to its new home and prepare to fill it and plant in it.

Next Up: Let’s fill up our raised flower bed frames and layer the growing medium inside.
We will also start the process of deciding what we are going to plant in them to help these beds bloom with beauty! See how to plan your flower bed design!
Getting Started with Flower Gardening
Building a Raised Flower Bed Garden
Choosing Flowers
Types of Flower Gardens
Flower Gardening for Pollinators
Growing Flowers in Containers
Spring and Fall Bulbs
Caring for Flowers
More Like This


ADVERTISEMENT
I applaud your effort and your results, BRAVO!!! All that matters is that it works...principally for you to meets your needs. There are innumerable ways to build a raised-bed and the feeling of accomplishment that you experience while doing so, is immeasurable. I think it's a great idea and a wonderful way to plant flowers, herbs, and even food. There will always be "nay-sayers" and negativity generated from miserable individuals who seemingly think they "know a better way to do it"...I'd rather focus on the happiness you get from DIY and getting published!!! HOORAH!!!
I am disappointed you did not line your bed. And we didn't need bulky posts in corners so again not good design. I would not recommend this article as an example of how to build a raised bed unless you have lots of acres and free lumber.
Lowes (likely elsewhere too) has a Landscaping stone with groves in each side. You thread board ends into those to create your frame. The only cuts I made were on the shorter end pieces to fit my space which was 4' so I got 2 boards 4' long for every one, 8' board I bought. Since I was using 2x8" boards & going 24" high this meant with only 3 boards I completed both ends. I went 8' long as well for 3 boards on each side (total of 9, 2X8's). No nailing & only three cuts. Stacked the landscaping stones at each corner & slid the boards into place.
A few minutes of cutting & placing then Voilà.
I do suggest painting before filling with dirt & if possible placing a material barrier between the sides & dirt as well. The 1st one I built I did not put a barrier in & the Termites went to town. 2 years later I had to rebuild it. An old plastic pool liner has been repurposed & is working perfectly! I applied it while the paint was wet, so it adhered to the wood.
Comments