Quantcast
Green Beans: Planting and Growing Pole and Bush Beans | The Old Farmer's Almanac

Green Beans

Photo Credit
Brytta/Getty Images
Botanical Name
Phaseolus vulgaris
Plant Type
Sun Exposure
Bloom Time
Flower Color
No content available.
Subhead

Planting, Growing, and Harvesting Pole and Bush Beans

Print Friendly and PDF

Green beans are a staple of so many vegetable gardens because they are so easy to grow—even in limited space—and incredibly productive! Here’s how to plant, grow, and harvest green beans, including both the pole and bush types.

About Green Beans

All green beans (also called “string beans” or “snap beans”) are tender annuals. Though most green beans are indeed green, they also come in purple, red, yellow, and streaked varieties.

What’s the Difference Between Bush Beans and Pole Beans?

The main difference between the many types of green beans is whether their growing style is classified as “bush” or “pole.”

  • Bush beans grow compactly (reaching about two-feet tall) and do not require extra support from a structure like a trellis. 
  • Pole beans grow as climbing vines that may reach 10 to 15 feet tall and require a trellis or staking.
    • Watch this video to learn how to support beans properly.

There are upsides and downsides to both types, of course:

  • Bush beans generally require less maintenance due to their size, but pole beans typically yield more beans for longer and are mostly disease-resistant.
  • Bush beans produce in about 50 to 55 days; pole beans will take 55 to 65 days. 
  • Bush beans often come in all at once, so stagger your plantings every two weeks to get a continuous harvest. Pole beans need their vines to grow and will produce for a month or two if you keep harvesting.
Planting

Beans grow best in well-draining soil with normal fertility and an acidic to neutral pH (6.0–7.0). They don’t typically need supplemental fertilizer because they fix their own nitrogen in the soil. However, particularly poor soil should still be amended with aged manure or compost in the fall prior to planting (or about a week before planting in the spring). 

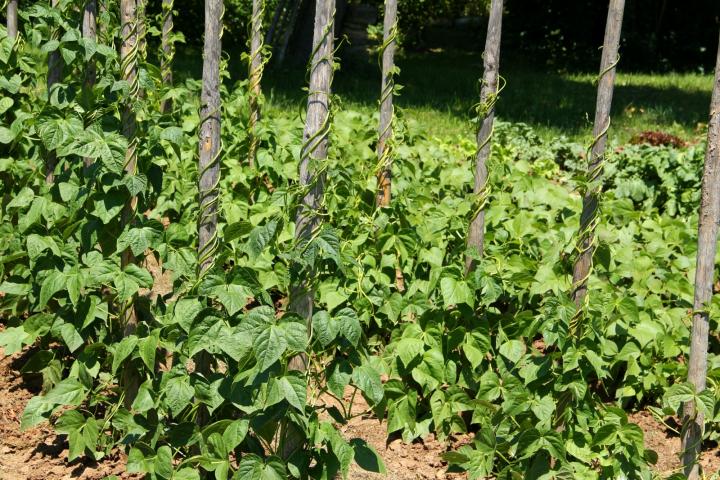
Beans don’t like having their roots disturbed, so set up any supports for pole beans prior to planting. 

When to Plant Beans

  • Beans grow best when direct-seeded outdoors. Sow any time after the last spring frost date, when soil have warmed to at least 48°F (9°C). Don’t plant too early, as cold, moist soil will delay germination and could cause the seeds to rot.
    • Tip: To get a head start on planting, place black plastic or landscaping fabric over your garden beds to warm the soil prior to sowing seeds.
  • Do not start green bean seeds indoors. Due to their fragile roots, they may not survive transplanting. Plus, they’re such fast growers that there’s no real advantage to starting them early indoors.

Spacing for beans

How to Plant Beans

  • Sow bush beans 1 inch deep and 2 inches apart in rows 18 inches apart.
  • Sow pole beans 1 inch deep, placing them around supports.
    • Tip: Plant pole and bush beans a little deeper in sandy soils, but not too deep. Seedlings cannot push through soil that is too deep, heavy, dense, packed, and/or mulched; they will break their “necks” in trying to emerge.
  • For pole beans, set up trellises, stakes, or other supports prior to planting so that the plants’ fragile roots are not disturbed.
    • One option is to create a tepee: Tie three or four (or more) 7-foot-long bamboo poles or long, straight branches together at the top and splay the legs in a circle. Then plant three or four seeds around each pole. As vines appear, train them to wind up the poles. For more stability, wrap string/wire around the poles about halfway up, encircling the tepee; this gives the vines something to grab.
    • Another easy support for them is a “cattle panel”—a portable section of wire fence—16 feet long and 5 feet tall. The beans will climb with ease and you won’t have to get into contorted positions to pick them.
  • For a continued harvest that lasts all summer, sow seeds every 2 weeks. If you’re going to be away and unable to harvest, skip a planting. Beans do not wait for anyone!
  • Practice crop rotation (planting crops in different areas each year) to avoid the build up of pests and diseases in one spot.

How to Grow Beans From Planting to Harvest

Growing
  • Mulch soil around bean plants to retain moisture; make sure that it is well-drained. Beans have shallow roots, so mulch keeps them cool.
  • Water regularly, about 2 inches per square foot per week. If you do not keep beans well watered, they will stop flowering. Water on sunny days so that foliage will not remain soaked, which could encourage disease.
  • If necessary, begin fertilizing after heavy bloom and the set of pods. Avoid using high-nitrogen fertilizer or you will get lush foliage and few beans. A side dressing of compost or aged manure halfway through the growing season is a good alternative to liquid fertilizer.
  • Weed diligently but carefully to avoid disturbing the beans’ roots.
  • Pinch off the tops of pole bean vines when they reach the top of the support. This will force them to put energy into producing more pods instead.
  • In high heat, use row covers over young plants; hot weather can cause blossoms to drop from plants, reducing the harvest.
Green bean plants trained up stakes. Photo by fotolinchen/Getty Images.
Harvesting
  • Harvest beans in the morning when their sugar level is highest.
  • Pick green beans every day; the more you pick, the more beans grow.
  • Green beans are picked young and tender before the seeds inside have fully developed. 
  • Look for firm, sizable pods that are firm and can be snapped—generally as thick as a pencil. 
  • Snap or cut the beans off the plant, being careful not to tear the plant. Fresh beans should snap easily when broken.
  • Once you see the seeds inside bulging, green beans are past their peak and will taste tough.

How to Store Green Beans

  • Store beans in an airtight container in the refrigerator for up to 4 days.
  • Beans will toughen over time even when stored properly.
  • Alternatively, blanch and freeze immediately after harvesting.
  • Beans can also be canned or pickled.
Wit and Wisdom
  • Beans are commonly used in everyday expressions to indicate something of little value. Something that “isn’t worth a hill of beans” is not worth much.
  • According to folklore, in order to get rid of a wart, rub it with a bean and cast the bean over your shoulder without looking back.

Pests/Diseases

Green Bean Pests and Diseases

Pest/Disease Type Symptoms Control/Prevention
Anthracnose Fungus Yellow/brown/purple/black spots on leaves; sunken, dark spots on stems and pods; spots may develop a salmon-pink, gelatinous mass; eventually, rot Destroy infected plants; choose resistant varieties; provide good drainage; avoid overhead watering; apply compost; use mulch; rotate crops
Aphids Insect

Misshapen/yellow leaves; distorted flowers/pods; sticky “honeydew” (excrement); sooty, black mold

Grow companion plants; knock off with water spray; apply insecticidal soap; put banana or orange peels around plants; wipe leaves with a 1 to 2 percent solution of dish soap (no additives) and water every 2 to 3 days for 2 weeks; add native plants to invite beneficial insects

Cucumber beetles Insect

Holes in leaves/flowers; rasped pods; plants stunted/die; may transmit bacterial wilt

Handpick; mulch heavily; use row covers; destroy plants infected with bacterial wilt

Cutworms Insect

Wilting; severed stems of seedlings and transplants just above or below soil line; whole seedlings disappear

Handpick; in spring before planting, cultivate soil to reduce larvae; wrap a 4-inch-wide collar made from cardboard or newspaper around each stem, sinking 2 inches into soil; weed; use row covers; destroy crop residue

Japanese beetles Insect

Leaves skeletonized (only veins remain); stems/flowers/pods chewed; grubs feed on roots

Handpick; use row covers

Leafhoppers Insect

White shed skins on leaf undersides (from nymph molting); stippling (many tiny spots) on leaves; “hopperburn” (leaves yellow/brown, curled, or stunted); reduced yield

Knock nymphs off leaf undersides with strong spray of water; use row covers; monitor adults with yellow sticky traps; weed; destroy crop residue

Mexican bean beetles Insect

Lacey, skeletonized foliage; dark holes on pods

Handpick; purchase and release beneficial wasp Pediobius foveolatus when larvae observed; destroy severely infested plants; use row covers

Mosaic virus (bean) Virus

Leaves show green mottling (mosaic pattern) and may be distorted, blistered, curled downward; plants stunted

Destroy infected plants; choose resistant varieties and certified virus-free seed; use row covers; disinfect tools; weed; control aphids

Powdery mildew Fungus

White spots on upper leaf surfaces expand to flour-like coating over entire leaves; foliage may yellow/die; distortion/stunting of leaves/flowers

Destroy infected leaves or plants; choose resistant varieties; plant in full sun, if possible; ensure good air circulation; spray plants with 1 teaspoon baking soda dissolved in 1 quart water; destroy crop residue

Root-knot nematodes Nematode

Typically, roots “knotty” or galled; plants stunted/yellow/wilted

Destroy crop residue, including roots; choose resistant varieties; solarize soil; add aged manure/compost; disinfect tools; till in autumn; rotate crops

Slugs/snails Mollusk

Irregular holes in leaves/flowers; gouged pods; slimy secretion on plants/soil; seedlings “disappear”

Handpick; avoid thick bark mulch; use copper plant collars; avoid overhead watering; lay boards on soil in evening, and in morning dispose of “hiding” pests in hot, soapy water; drown in deep container filled with 1/2 inch of beer, or sugar water and yeast, and sunk so that top edge is slightly above ground; apply 1-inch-wide strip of food-grade diatomaceous earth as barrier

Stinkbugs Insect

Yellow/white blotches on leaves; scarred, dimpled, or distorted pods; shriveled seeds; eggs, often keg-shape, in clusters on leaf undersides

Destroy crop residue; handpick (bugs emit odor, wear gloves); destroy eggs; spray nymphs with insecticidal soap; use row covers; weed; till soil in fall

White mold Fungus

Pale gray, “water-soaked” areas on stems, leaves, and other plant parts that enlarge and develop white, cottony growth, later with black particles; bleached areas; crowns/pods rot; plants wilt/collapse

Destroy infected plants; ensure good air circulation; water in morning; weed; destroy crop residue; rotating crops on 5-year or longer cycle may help

Whiteflies Insect

Sticky “honeydew” (excrement); sooty, black mold; yellow/silver areas on leaves; wilted/stunted plants; distortion; adults fly if disturbed; some species transmit viruses

Remove infested leaves/plants; use handheld vacuum to remove pests; spray water on leaf undersides in morning/evening to knock off pests; monitor adults with yellow sticky traps; spray with insecticidal soap; invite beneficial insects and hummingbirds with native plants; weed; use reflective mulch

Wireworms Insect

Seeds hollowed; seedlings severed; stunting/wilting; roots eaten

Trap by digging 2- to 4-inch-deep holes every 3 to 10 feet, fill with mix of germinating beans/corn/peas or potato sections as bait, cover with soil or a board, in 1 week uncover and kill collected wireworms; sow seeds in warm soil for quick germination; provide good drainage; remove plant debris; rotate crops

Gardening Calendar